Chevrolet Silverado: Trailer Towing / Trailering App
Trailer Light App
If equipped, the Trailer Lights App is on the Home Page of the infotainment display.
Touch Start to cycle the trailer lamps on and off to determine if they are working. The test follows this sequence:
- The running lights turn on first and remain on throughout the sequence.
- The brake lights turn on for about two seconds.
- The left turn signal light flashes three times.
- The right turn signal light flashes three times.
- The reverse lights turn on for about two seconds.
- Steps 2–5 repeat for approximately one minute and 45 seconds, or until the test deactivates.
Touch Stop to stop the test. The test will automatically end after one minute and 45 seconds.
The sequence also deactivates when any of the following occur:
- The ignition is turned off.
- The transmission is shifted out of P (Park).
- The brake pedal is pressed.
- The turn signal is activated.
- The hazard warning lights are activated.
Trailering App
If equipped, the Trailering App is on the Home Page of the infotainment display.
If equipped this feature allows profiles for connected trailers to be created to view status, to store and track trailer usage information, and to set up towing assistance features.
The Trailering App Preview will appear when the Trailering App is opened for the first time from the Home Page. Touch GET STARTED in the Trailering App to go into the app.
When a trailer is electrically connected, there will be an option to create a profile, use a guest profile, or cancel. After Cancel is selected a third time, Don’t Remind Me will display and touching that will turn off the trailer detection pop-up. To turn the Trailer Detection Alert on, select ON in the Settings tab.
When a trailer is electrically connected and after a Trailer Profile has been created, the trailer detection pop-up will appear with a list of all of the custom Trailer Profiles made on the vehicle. To load an existing Trailer Profile, select one of the Trailer Profiles listed, or load the Guest Trailer Profile by selecting GUEST TRAILER. Touching Cancel, Accessory/No trailer, or shifting the vehicle from P (Park), will select Accessory/No trailer as the active Trailer Profile and will dismiss the pop- up.
Create a Trailer Profile
- Touch Create Profile on the pop-up or touch + Add Trailer in the Trailering App.
- Create a name for the trailer.
- Select the hitch type. A checklist profile will be created based on the type selected.
- Select the trailer type.
A pop-up will indicate the setup is complete. Touch DONE to complete the process or touch TRAILER FEATURE SETUP to set up the Tow/Haul Mode reminder, Trailer Tire Pressure Monitoring System, if equipped, maintenance reminders, or towing assistance, if equipped.
Import a Trailer Profile
A trailer profile saved to an OnStar account can be imported to the vehicle.
- Touch Import Profile on the pop-up.
- Select a trailer profile from the list.
- Touch IMPORT.
A pop-up will indicate the import was successful. Touch OK to return to the trailer list and select the trailer profile. The Tow/Haul Mode reminder, Brake Gain Setting and Trailer Tire Pressure sensor learning, if equipped, do not import.
Trailer Feature Setup
Tow/Haul Mode Reminder
To turn the Tow/Haul Mode Reminder setting on, touch Yes. To turn it off, touch No.
Trailer Tire Pressure Setup
If the Trailer Tire Pressure Monitoring System (TTPMS) is detected, touch the Tire Pressure Monitoring icon to set up tire pressure monitoring.Touch Yes to set up the sensors or touch No to return to the previous screen.
A trailer must be electrically connected to the vehicle before starting the sensor-to-vehicle learn process.
After selecting Start from the Learn Sensors screen, use the Tool Method or the Manual Method (described below) to learn each tire sensor, during which the current tire number will be highlighted.
Each sensor has a minimum of two minutes to learn, shown by a timer. After a sensor is learned, a checkmark appears next to the tire, the vehicle horn will sound, the vehicle’s brake lamps will flash, and all working trailer lamps will flash. It then moves to the next sensor.
To cancel the process touch Stop.
The recommended tire pressure must be entered for the trailer tires. This allows the vehicle to alert when the tire pressure is high or low.
TTPMS must learn the location of the installed tire sensors to show correct air pressure and temperature for each tire. To set up, use one of the following options or see a tire or trailer dealer for service. The learning process must be repeated when the trailer tires are rotated or replaced. See “Editing a Trailer Profile” later in this section for tire pressure sensor relearn information.
Tool Method: A TTPMS activation tool can be purchased separately to learn the sensor locations.
Manual Method: Without the tool, the air pressure can be increased or decreased in each tire for 10 seconds. Do not exceed the maximum inflation pressure found on the tire sidewalls. Make sure to re-adjust tire pressure to the recommended level when the process is complete.
Sensor Learning Steps
To complete the sensor-to-vehicle learn process:
- Touch Start on the Learn Sensors screen. The horn chirps twice and the Learning Active screen appears on the infotainment display.
- Start with the driver side front trailer tire.
- Activate the tool near the valve stem or adjust the air pressure of this
tire until the horn chirps and all working vehicle and trailer lights flash.
The process stops without saving the sensor locations if this step takes more than two minutes.
- Move to the next tire and repeat Step 3 for each sensor. The horn chirps twice when all sensors are completed.
- Return to the vehicle to complete the setup.
Maintenance Reminders
To set up maintenance reminders, touch the Trailer Maintenance icon. Select Yes to set up the maintenance reminders for the Trailer Profile. Follow the on-screen prompts. The maximum number of reminders is 50. Select No to return to the previous screen.
Towing Assistance
If the Transparent Trailer feature is available, touch the Towing Assistance icon to set up transparent trailer.
Touch Yes to begin set up or touch No to return to the previous screen. Follow the on-screen instructions.
A rear trailer camera must be mounted on the trailer and electrically connected to the vehicle before transparent trailer feature can be used. See Assistance Systems for Parking or Backing.
Trailer dimensions must be in range and transparent trailer must be calibrated prior to use.
Transparent Trailer Setup
To complete setup for transparent trailer:
- Select the number of axles on the trailer.
- Enter trailer dimensions
- Trailer Length: 300 cm (118.1 in) – 970 cm (381.8 in). Measure from center of coupler to furthest rear point on the trailer.
- Trailer Width: 120 cm (47.2 in) – 260 cm (102.3 in). Measure from left edge to right edge.
- Trailer Height: 1 cm (0.39 in) – 450 cm (177.1 in). Measure from ground to tallest point.
- Hitching Point Length: 180 cm (70.8 in) – 970 cm (381.8 in). Measure from center of coupler to middle of tires.
- Trailer Tongue Length: 50 cm (119.6 in) – 220 cm (86.6 in). Measure from center of coupler to trailer front wall.
- Vehicle Hitch Height: 10 cm (3.9 in) – 100 cm (39.3 in). Measure from ground to top of coupler.
- Vehicle Hitch Length: 10 cm (3.9 in) – 100 cm (39.3 in). Measure from hitch receiver to center of ball.
- If trailer dimensions are out of range, this feature will be unavailable. Select OK to return.
- Ensure rear trailer camera is connected.
- Follow instructions to drive forward to complete calibration.
- Return to the vehicle to complete the setup.
Status View
The Status view shows:
- Truck
- Connections
- Trailer
- Maintenance
- Cameras
Upon entry, the most recent items will be shown. Select MORE to view all options.
Truck

Transmission Fluid Temperature
Average Fuel Economy with Trailer Profile
Average Fuel Economy
Touch to view the average fuel economy of the vehicle while the Trailer Profile is active.
Transmission Temperature
View the temperature of the transmission fluid by looking at the graphic. The graphic will indicate a dangerous level if the temperature is at 130 °C–150 °C (270 °F–300 °F).
Connections
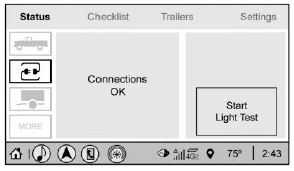
Light Test Start Button
Trailer Electrical Diagnostics
Connections OK
If all of the trailer connections are detected (Running Lights, Left Turn Signal Light, Right Turn Signal Light, Reverse Lights, and Electric Brakes, if equipped), the view will display OK.
Connection Problem
If any of the trailer connections are not detected, a message about the connection issue will appear on the Driver Information Center (DIC). The infotainment display will also show the connection issue in the Connection Status view.
Diagnose View
Touch Diagnose to see more information about the connection problem.
This view will display the names of the trailer connector pins, a graphic of the trailer connector, and a graphic of the back of the trailer.
Any connector pin that failed will be amber color, and the location of the corresponding connection will be highlighted on the graphic of the back of the trailer.
The Running Lights connection may not detect partial outages. Activate the light test to check all trailer lamps. See “Light Test” following.
If the trailer is not equipped with reverse lights or electric brakes and you are receiving failure messages in the DIC or on this view, turn off the Reverse Lights Alert or the Electric Brakes Alert setting in the trailer’s profile page.
Light Test
Touch Start Light Test to cycle the trailer lights on and off to determine if they are working. The test follows this sequence:
- The running lights turn on first and remain on throughout the sequence.
- The brake lights turn on for about two seconds.
- The left turn signal light flashes three times.
- The right turn signal light flashes three times.
- The reverse lights turn on for about two seconds.
- Steps 2–5 repeat for approximately one minute and 45 seconds, or until the test deactivates.
Touch Stop to stop the test. The test will automatically end after one minute and 45 seconds.
The sequence also deactivates when any of the following occur:
- The ignition is turned off.
- The transmission is shifted out of P (Park).
- The brake pedal is pressed.
- The turn signal is activated.
- The hazard waming lights are activated.
 Trailer Sway Control (TSC)
Vehicles with StabiliTrak/Electronic Stability Control (ESC) have a Trailer Sway
Control (TSC) feature. Trailer sway is unintended side-to-side motion of a trailer
while towing...
 Trailer
Trailer Tire Pressure/Temperature
Mileage of Trailer
Mileage
The mileage accumulated while this Trailer Profile is active will display...
Other information:
Chevrolet Silverado 2019-2026 Owners Manual: Parking on Hills
Warning To prevent serious injury or death, always park your vehicle and trailer on a level surface when possible. When parking your vehicle and your trailer on a hill: Press the brake pedal, but do not shift into P (Park) yet. Turn the wheels into the curb if facing downhill or into traffic if facing uphill...
Chevrolet Silverado 2019-2026 Owners Manual: Power Release Tailgate
Warning Make sure there is no one in the way of the power tailgate as it is opening and closing, and keep hands away from the tailgate hinges when in use. You or others could be injured if caught in the path of the power tailgate or tailgate hinges...
Categories
- Manuals Home
- 4th Generation Silverado Owners Manual
- 4th Generation Silverado Service Manual
- Electronic Stability Control (ESC) Off Light
- Instrument Panel Fuse Block (Left)
- Heated Steering Wheel
- New on site
- Most important about car
Rear Camera Mirror
If equipped, this automatic dimming mirror provides a wide angle camera view of the area behind the vehicle.