Chevrolet Silverado: Trailer Towing / Towing Equipment
Hitches
Conventional Hitch
A conventional hitch is bolted to the frame or cross member of the tow vehicle, and is generally rated Class 2, 3, or 4.
Gooseneck Hitch
A gooseneck hitch is designed to be coupled to a special hitch leveraging a hitch ball, and is mounted over the rear axle in the truck bed.
Fifth-Wheel Hitch
A fifth-wheel hitch is mounted over the rear axle in the truck bed, and leverages a hinged plate — the same type of hitch leveraged by semi trucks. Generally, fifth-wheel hitches accommodate large trailers with as many as one, two, or three axles.
Always use the correct hitch equipment for your vehicle. Crosswinds, large trucks going by, and rough roads can affect the trailer and the hitch.
Proper hitch equipment for your vehicle helps maintain control of the vehicle-trailer combination. Many trailers can be towed using a weight-carrying hitch which has a coupler latched to the hitch ball, or a tow eye latched to a pintle hook. Other trailers may require a weight-distributing hitch that uses spring bars to distribute the trailer tongue weight between your vehicle and trailer axles. Fifth-wheel and gooseneck hitches may also be used. See “Maximum Trailer Tongue Weight” under Trailer Towing for weight limits with various hitch types.
Avoid sharp turns when using a step-bumper hitch to prevent damage. Make wider turns to prevent contact between your trailer and your bumper.
Consider using mechanical sway controls with any trailer. Ask a trailering professional about sway controls or refer to the trailer manufacturer's recommendations and instructions.
Weight-Distributing Hitch and Adjustment
A weight-distributing hitch may be useful with some trailers. Use the following guidelines to determine if a weight-distributing hitch should be used.

-
Front of Vehicle
-
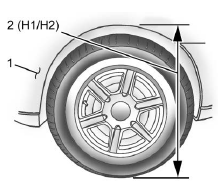
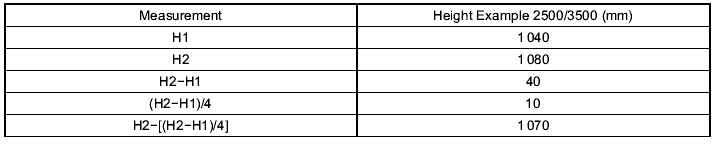
H1/H2 Body to Ground Distance
Towing with Model 1500 Trucks
- Position the truck so that the trailer is ready to connect. Keep the trailer detached.
- Measure the height of the top of the front wheel opening at the fender to the ground (H1).
- Attach the vehicle to the trailer. Do not attach weight distribution bars at this time.
- Measure the height of the top of the front wheel opening on the fender to the ground (H2).
- Install and adjust the tension in the weight-distributing bars per the manufacturers’ recommendations so that the height of the front fender is approximately H2−[(H2−H1)/2] (halfway between the two measured ride heights).
- Visually inspect the trailer and weight-distributing hitch to ensure that the manufacturers’ recommendations have been met.

Towing with Model 2500/3500 Trucks
- Position the truck so that the trailer is ready to connect. Keep the trailer detached.
- Measure the height of the top of the front wheel opening at the fender to the ground (H1).
- Attach the vehicle to the trailer. Do not attach weight distribution bars at this time.
- Measure the height of the top of the front wheel opening on the fender to the ground (H2).
- Install and adjust the tension in the weight-distributing bars per the manufacturers’ recommendations so that the height of the front fender is approximately H2−[(H2−H1)/4] (1/4 the difference between the two measured ride heights, below the secondary ride height {H2}).
- Visually inspect the trailer and weight-distributing hitch to ensure that the manufacturers’ recommendations have been met.
Tires
- Do not tow a trailer while using a compact spare tire on the vehicle.
- Tires must be properly inflated to support loads while towing a trailer. See Tires for instructions on proper tire inflation.
Fifth-Wheel and Gooseneck Trailering
Fifth-wheel and gooseneck trailers can be used with many pickup models. These trailers place a larger percentage of the weight (kingpin weight) on the tow vehicle than conventional trailers. Make sure this weight does not cause the vehicle to exceed GAWR or GVWR. Fifth-wheel or gooseneck kingpin weight should be 15–25% of the trailer weight up to the maximum amount specified in the trailering chart for the vehicle. See “Trailer Weight" under Trailer Towing.
The hitch should be in the pickup bed so that its centerline is over or slightly in front of the rear axle. Take care that it is not so far forward that it will contact the back of the cab in sharp turns. This is especially important for short box pickups. Trailer pin box extensions and sliding fifth-wheel hitch assemblies may be used. There should be at least 15 cm (6 in) of clearance between the top of the pickup box and the bottom of the trailer shelf that extends over the box.
Make sure the hitch is attached to the tow vehicle frame rails. Do not use the pickup box for support.
Safety Chains
Always attach safety chains between the vehicle and the trailer. Instructions about safety chains may be provided by the hitch manufacturer or by the trailer manufacturer.
If the trailer being towed weighs up to 2 271 kg (5,000 lb) with a factory-installed step bumper, safety chains may be attached to the attaching points on the bumper; otherwise, safety chains should be attached to holes on the trailer hitch.
Cross the safety chains under the tongue of the trailer to help prevent the tongue from contacting the road if it becomes separated from the hitch. Always leave enough slack in the safety chains to allow the combination to turn. Never allow safety chains to drag on the ground.
Trailer Brakes
Loaded trailers over 900 kg (2,000 lb) must be equipped with brake systems and with brakes for each axle. Trailer braking equipment conforming to Canadian Standards Association (CSA) requirement CAN3-D313, or its equivalent, is recommended.
State or local regulations may require trailers to have their own braking system if the loaded weight of the trailer exceeds certain minimums that can vary from state to state. Read and follow the instructions for the trailer brakes so they are installed, adjusted, and maintained properly. Never attempt to tap into your vehicle's hydraulic brake system. If you do, both the vehicle antilock brakes and the trailer brakes may not function, which could result in a crash.
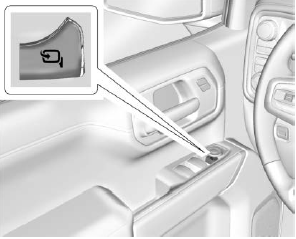
Auxiliary Battery
If equipped, the vehicle's auxiliary battery can be used to supply electrical power to additional equipment that may be added, such as a slide-in camper.
Locate the auxiliary battery connector under the hood on the driver side of the vehicle, next to the engine compartment fuse block. Follow the proper installation instructions included with any electrical equipment that is installed.
Caution
To prevent draining the auxiliary battery, always turn off electrical equipment when not in use and do not use any equipment that may exceed the maximum amperage rating of 30 amps.
Trailer Wiring Harness
Basic Trailer Wiring
If the vehicle is not equipped with a trailer connector on the rear bumper, a 7-wire trailering harness is tied to the vehicles frame. The harness requires the installation of a trailer connector, which is available through your dealer.
Use only a round, seven-wire connector with flat blade terminals meeting SAE J2863 specifications for proper electrical connectivity.
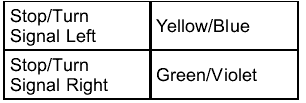
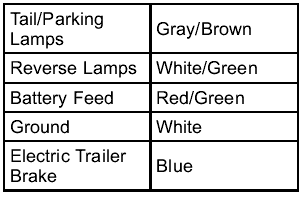
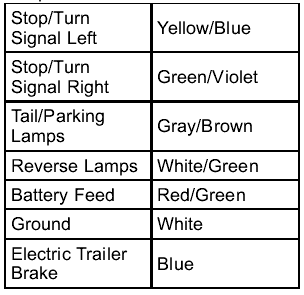
The seven-wire harness contains the following trailer circuits:
Heavy-Duty Trailer Wiring Harness Package
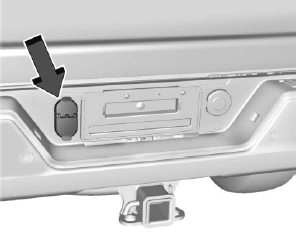
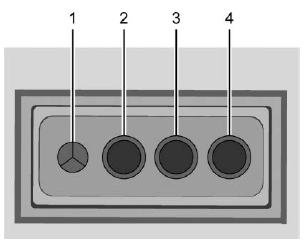
If equipped, the trailer wiring harness, with a 7-pin connector and a 4-pin connector, is mounted on the vehicle's rear bumper.
The trailer connectors contain the following circuits.
- Ground
- Tail Lamps
- Left Turn/Brake
- Right Turn/Brake

- Left Turn/Brake
- Tail Lamps
- Reverse Lamps
- Battery Feed
- Right Turn/Brake
- Electric Brakes
- Ground
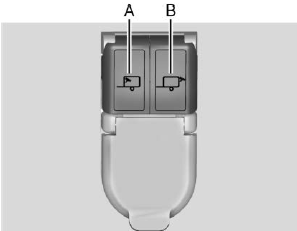
If equipped, trailering camera connectors are available in the bumper trailer receptacle in place of the four pin connector. The inside trailer auxiliary camera should be installed on the top left hand side (A) and the rear trailer auxiliary camera (B) should be installed on the top right hand side.
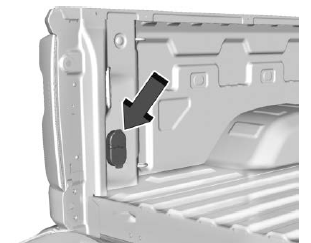
If equipped with the fifth wheel/gooseneck trailer package, the harness connector is mounted on the inside of the pickup bed behind the rear wheel.
Camper/Fifth-Wheel Trailer Wiring Package
For vehicles without the fifth wheel/gooseneck trailer package, the seven-wire camper harness is under the rear bumper, attached to the frame near the rear crossmember. A connector must be added to the wiring harness that connects to the camper.
The harness contains the following camper/trailer circuits:
If equipped with the heavy-duty trailering option, see “Heavy-Duty Trailer Wiring Harness Package” earlier in this section. When the camper-wiring harness is ordered without the heavy-duty trailering package, a seven-wire harness with a seven-pin connector is at the rear of the vehicle and is tied to the vehicle's frame.
Trailer Lamps
Always check that all trailer lamps are working at the beginning of each trip, and periodically on longer trips.
If equipped, the Trailering App will monitor the RH turn/brake lamp circuit, LH turn/brake lamp circuit, running lamp circuit, and reverse lamp circuits on the trailer. DIC messages and Trailering App alerts may be displayed if lighting circuit issues are detected on the trailer.
Pressing START LIGHT TEST in the Trailering App automatically activates the trailer lamps. The Trailering App is not a substitute for manually inspecting your trailer lamps. See Trailering App.
Turn Signals When Towing a Trailer
When properly connected, the trailer turn signals will illuminate to indicate the vehicle is turning, changing lanes, or stopping. When towing a trailer, the arrows on the instrument cluster will illuminate even if the trailer is not properly connected or the bulbs are burned out.
Tow/Haul Mode
For instructions on how to enter Tow/Haul Mode, see Driver Mode Control.
Tow/Haul assists when pulling a heavy trailer or a large or heavy load. See Tow/Haul Mode.
Tow/Haul Mode is designed to be most effective when the vehicle and trailer combined weight is at least 75% of the vehicle's Gross Combined Weight Rating (GCWR). See “Trailer Weight” under Trailer Towing.
Tow/Haul Mode is most useful when towing a heavy trailer or carrying a large or heavy load:
- Through rolling terrain.
- In stop-and-go traffic.
- In busy parking lots.
Operating the vehicle in Tow/Haul Mode when lightly loaded or not towing will not cause damage; however, it is not recommended and may result in unpleasant engine and transmission driving characteristics, heavy or light steering efforts, and reduced fuel economy.
Integrated Trailer Brake Control System
The vehicle may have an Integrated Trailer Brake Control (ITBC) system for use with electric trailer brakes or most electric over hydraulic trailer brake systems. These instructions apply to both types of electric trailer brakes.

This symbol is on the Trailer Brake Control Panel on vehicles with an ITBC system. The power output to the trailer brakes is proportional to the amount of vehicle braking. This available power output to the trailer brakes can be adjusted to a wide range of trailering situations.
The ITBC system is integrated with the vehicle’s brake, antilock brake, and StabiliTrak/Electronic Stability Control (ESC) systems. In trailering conditions that cause the vehicle’s antilock brake or StabiliTrak/ESC systems to activate, power sent to the trailer's brakes will be automatically adjusted to minimize trailer wheel lock-up. This does not imply that the trailer has StabiliTrak/ESC.
If the vehicle’s brake, antilock brake, or StabiliTrak/ESC systems are not functioning properly, the ITBC system may not function fully or at all. Make sure all of these systems are fully operational to allow the ITBC system to function properly.
The ITBC system is powered through the vehicle's electrical system. Turning the ignition off will also turn off the ITBC system. The ITBC system is fully functional only when the ignition is in on.
Warning
Connecting a trailer that has an air brake system may result in reduced or complete loss of trailer braking, including increased stopping distance or trailer instability which could result in serious injury, death, or property damage. Only use the ITBC system with electric or electric over hydraulic trailer brake systems.
Trailer Brake Control Panel
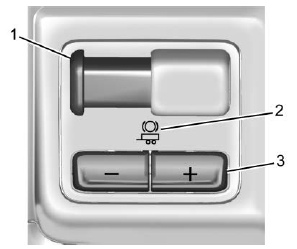
- Manual Trailer Brake Apply Lever
- Trailer Symbol
- Trailer Gain Adjustment Buttons
The trailer symbol on the control panel will light amber when a trailer with electric brakes is connected.
The ITBC control panel is on the center stack. See Instrument Panel Overview. The control panel allows adjustment to the amount of output, referred to as Trailer Gain, available to the trailer brakes and allows manual application of the trailer brakes. Use the ITBC control panel and the DIC trailer brake display page to adjust and display power output to the trailer brakes.
Trailer Brake DIC Display Page
The ITBC display page indicates:
- Trailer Gain setting
- Output to the trailer brakes
- Trailer connection
- System operational status
To display:
- Scroll through the DIC menu pages
- Press a Trailer Gain (+) or (−) button
- Activate the Manual Trailer Brake Apply Lever
TRAILER GAIN: Press a Trailer Gain button to recall the current Trailer Gain setting. Each press and release of the gain buttons will then change the Trailer Gain setting. Press the Trailer Gain (+) or (-) to adjust. Press and hold to continuously adjust the Trailer Gain. To turn the output to the trailer off, adjust the Trailer Gain setting to 0.0. This setting can be adjusted from 0.0 to 10.0 with a trailer connected or disconnected.
TRAILER OUTPUT: This displays anytime a trailer with electric brakes is connected. Output to the trailer brakes is based on the amount of vehicle braking present and relative to the Trailer Gain setting. Output is displayed from 0 to 100% for each gain setting.
The Trailer Output will indicate “- - - - - -” on the Trailer Brake Display Page whenever the following occur:
- No trailer is connected.
- A trailer without electric brakes is connected. No DIC message displays.
- A trailer with electric brakes has become disconnected. A CHECK TRAILER WIRING message displays on the DIC.
- There is a fault present in the wiring to the trailer brakes. A CHECK TRAILER WIRING message displays on the DIC.
- The ITBC system is not working due to a fault. A SERVICE TRAILER BRAKE SYSTEM message displays in the DIC.
Manual Trailer Brake Apply Lever
Slide this lever right to apply the trailer’s electric brakes independent of the vehicle’s brakes. Use this lever to adjust the Trailer Gain to achieve proper power output to the trailer brakes. Under certain circumstances, this lever can also be used to apply additional trailer braking. The trailer and vehicle brake lamps will come on when either the vehicle brakes or trailer brakes are applied and properly connected.
Trailer Gain Adjustment Procedure
Trailer Gain should be set for a specific trailering condition and it must be readjusted anytime vehicle loading, trailer loading, or road surface conditions change.
Warning
Trailer brakes that are over-gained or under-gained may not stop the vehicle and the trailer as intended and can result in a crash. Always follow the instructions to set the Trailer Gain for the proper trailer stopping performance.
To adjust Trailer Gain for each towing condition:
- Drive the vehicle with the trailer attached on a level road surface representative
of the towing condition and free of traffic at about 32–40 km/h (20–25 mph)
and fully apply the Manual Trailer Brake Apply Lever.
Adjusting Trailer Gain at speeds lower than 32–40 km/h (20–25 mph) may result in an incorrect gain setting.
- Adjust the Trailer Gain, using the Trailer Gain (+) or (−) adjustment buttons,
to just below the point of trailer wheel lock-up, indicated by trailer wheel
squeal or tire smoke when a trailer wheel locks.
Trailer wheel lock-up may not occur if towing a heavily loaded trailer. Adjust the Trailer Gain to the highest allowable setting for the towing condition.
- Readjust Trailer Gain anytime vehicle loading, trailer loading, or road surface conditions change or if trailer wheel lock-up is noticed at any time while towing.
Other ITBC-Related DIC Messages
TRAILER CONNECTED: This message will briefly display when a trailer with electric brakes is first connected to the vehicle. This message will automatically turn off in about 10 seconds. This message can be acknowledged before it automatically turns off.
CHECK TRAILER WIRING: This message will display if:
- The ITBC system first determines connection to a trailer with electric brakes
and then the trailer harness becomes disconnected from the vehicle.
If the disconnect occurs while the vehicle is stationary, this message will automatically turn off in about 30 seconds. This message will also turn off if it is acknowledged or if the trailer harness is reconnected.
If the disconnect occurs while the vehicle is moving, this message will continue until the ignition is turned off. This message will also turn off if it is acknowledged or if the trailer harness is reconnected.
- There is an electrical fault in the wiring to the trailer brakes. This message will continue as long as there is an electrical fault in the trailer wiring. This message will also turn off if it is acknowledged.
To determine whether the electrical fault is on the vehicle side or trailer side of the trailer wiring harness connection:
- Disconnect the trailer wiring harness from the vehicle.
- Turn the ignition off.
- Wait 10 seconds, then turn the ignition back to RUN.
- If the CHECK TRAILER WIRING message reappears, the electrical fault is on the vehicle side.
If the CHECK TRAILER WIRING message only reappears when connecting the trailer wiring harness to the vehicle, the electrical fault is on the trailer side.
SERVICE TRAILER BRAKE SYSTEM: This message will display when there is a problem with the ITBC system. If this message continues over multiple ignition cycles, have the vehicle serviced.
If either the CHECK TRAILER WIRING or SERVICE TRAILER BRAKE SYSTEM message displays while driving, the ITBC system may not be fully functional or may not function at all. When traffic conditions allow, carefully pull the vehicle over to the side of the road and turn the ignition off. Check the wiring connection to the trailer and turn the ignition back on. If either of these messages continues, either the vehicle or trailer needs service.
A GM dealer may be able to diagnose and repair problems with the trailer. However, any diagnosis and repair of the trailer is not covered under the vehicle warranty. Contact your trailer dealer for assistance with trailer repairs and trailer warranty information.
 Trailer Towing
If equipped with a diesel engine, see the Duramax diesel supplement.
Caution
Towing a trailer improperly can damage the vehicle and result in costly
repairs not covered by the vehicle warranty...
 Trailer Sway Control (TSC)
Vehicles with StabiliTrak/Electronic Stability Control (ESC) have a Trailer Sway
Control (TSC) feature. Trailer sway is unintended side-to-side motion of a trailer
while towing...
Other information:
Chevrolet Silverado 2019-2026 Owners Manual: Memory Seats
If equipped, memory seats allow two drivers to save and recall their unique seat positions for driving the vehicle, and a shared exit position for getting out of the vehicle. Other feature positions may also be saved, such as power mirrors, if equipped...
Chevrolet Silverado 2019-2026 Owners Manual: Windows
Warning Never leave a child, a helpless adult, or a pet alone in a vehicle, especially with the windows closed in warm or hot weather. They can be overcome by the extreme heat and suffer permanent injuries or even death from heat stroke. The vehicle aerodynamics are designed to improve fuel economy performance...
Categories
- Manuals Home
- 4th Generation Silverado Owners Manual
- 4th Generation Silverado Service Manual
- Lower Anchors and Tethers for Children (LATCH System)
- Head-Up Display (HUD)
- Steering Column Lock
- New on site
- Most important about car
Folding Mirrors
Manual Folding Mirrors
If equipped, push the mirror toward the vehicle to fold. Push the mirror outward to return to its original position.
Manually fold the mirrors inward to prevent damage when going through an automatic car wash.
Power Folding Mirrors