Chevrolet Silverado: Child Restraints / Lower Anchors and Tethers for Children (LATCH System)
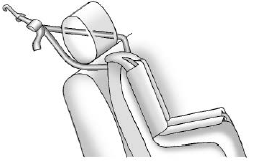
The LATCH system secures a child restraint during driving or in a crash. LATCH attachments on the child restraint are used to attach the child restraint to the anchors in the vehicle. This system is designed to make installation of a child restraint easier.
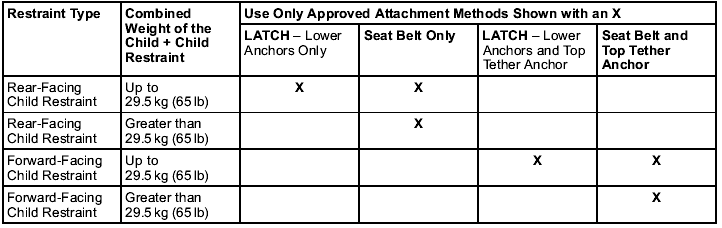
In order to use the LATCH system in your vehicle, you need a child restraint that has LATCH attachments. LATCH-compatible rear-facing and forward-facing child seats can be properly installed using either the LATCH anchors or the vehicle’s seat belts. Do not use both the seat belts and the LATCH anchorage system to secure a rear-facing or forward-facing child seat.
Booster seats use the vehicle’s seat belts to secure the child and the booster seat. If the manufacturer recommends that the booster seat be secured with the LATCH system, this can be done as long as the booster seat can be positioned properly and there is no interference with the proper positioning of the lap-shoulder belt on the child. Make sure to follow the instructions that came with the child restraint, and also the instructions in this manual.
When installing a child restraint with a top tether, you must also use either the lower anchors or the seat belts to properly secure the child restraint. A child restraint must never be installed using only the top tether.
For a forward-facing 5-pt harness child restraint where the combined weight of the child and restraint are up to 29.5 kg (65 lb), use either the lower LATCH anchorages with the top tether anchorage, or the seat belt with the top tether anchorage. Where the combined weight of the child and restraint are greater than 29.5 kg (65 lb), use the seat belt with the top tether anchorage only.
Recommended Methods for Attaching Child Restraints
See Securing Child Restraints (In the Center Front Seat) or Securing Child Restraints (With the Seat Belt in the Rear Seat) or Securing Child Restraints (With the Seat Belt in the Front Passenger Seat).
Child restraints built after March 2014 will be labeled with the specific child weight up to which the LATCH system can be used to install the restraint.
The following explains how to attach a child restraint with these attachments in the vehicle.
Not all vehicle seating positions have lower anchors. In this case, the seat belt must be used (with top tether where available) to secure the child restraint. See Securing Child Restraints (In the Center Front Seat) or Securing Child Restraints (With the Seat Belt in the Rear Seat) or Securing Child Restraints (With the Seat Belt in the Front Passenger Seat).
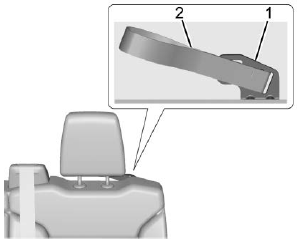
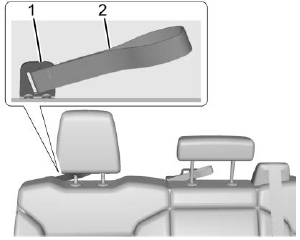
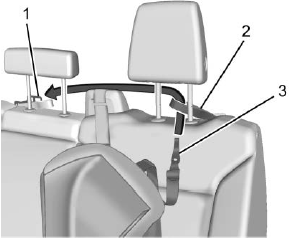
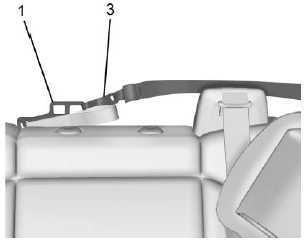
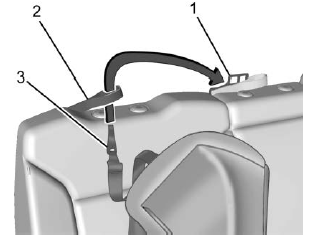
Lower Anchors
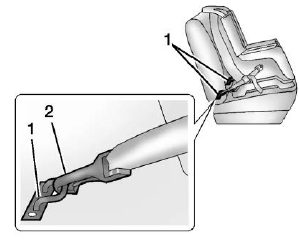
Lower anchors (1) are metal bars built into the vehicle. There are two lower anchors for each LATCH seating position that will accommodate a child restraint with lower attachments (2).
Top Tether Anchor
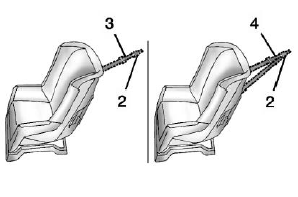
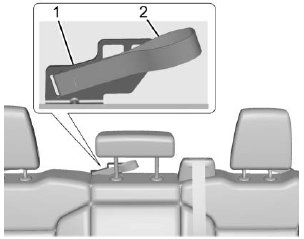
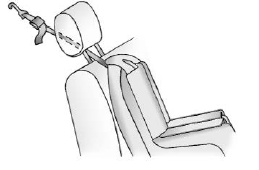
A top tether (3, 4) is used to secure the top of the child restraint to the vehicle. A top tether anchor is built into the vehicle. The top tether attachment hook (2) on the child restraint connects to the top tether anchor in the vehicle in order to reduce the forward movement and rotation of the child restraint during driving or in a crash.
The child restraint may have a single tether (3) or a dual tether (4). Either will have a single attachment hook (2) to secure the top tether to the anchor.
Some child restraints that have a top tether are designed for use with or without the top tether being attached. Others require the top tether always to be attached. In Canada, the law requires that forward-facing child restraints have a top tether, and that the tether be attached. Be sure to read and follow the instructions for your child restraint.
Lower Anchor and Top Tether Anchor Locations
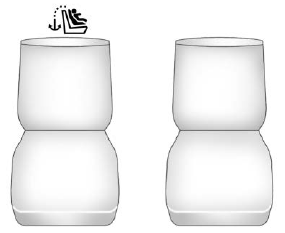
Regular Cab — Bucket Seat Onlya

Regular Cab — Three-Passenger Front Seat
 : Seating positions with top tether
anchors.
: Seating positions with top tether
anchors.
Do not install a child restraint in the center front seating position. See Securing Child Restraints (In the Center Front Seat) or Securing Child Restraints (With the Seat Belt in the Rear Seat) or Securing Child Restraints (With the Seat Belt in the Front Passenger Seat) for more information.
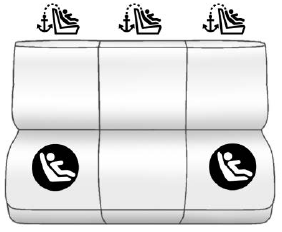
Double and Crew Cab Rear Seat
 : Seating positions with top tether
anchors.
: Seating positions with top tether
anchors.
 : Seating positions with two lower
anchors.
: Seating positions with two lower
anchors.
To assist in locating the lower anchors on double and crew cab models, each seating position with lower anchors has two labels near the crease between the seatback and the seat cushion.

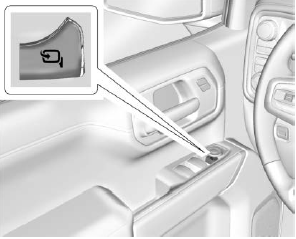
For regular cab models, there are top tether anchor symbols to assist you in locating the top tether anchors.
Do not install a child restraint in the center seating position. See Securing Child Restraints (In the Center Front Seat) or Securing Child Restraints (With the Seat Belt in the Rear Seat) or Securing Child Restraints (With the Seat Belt in the Front Passenger Seat) for more information.
Regular Cab
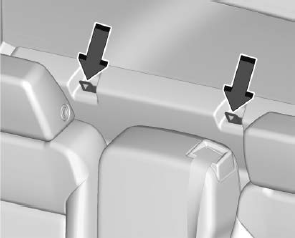
For regular cab models, the top tether anchors are on the back panel behind the passenger seat(s) or center seat. Be sure to use an anchor directly behind the seating position where the child restraint will be placed.
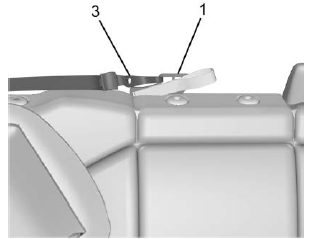
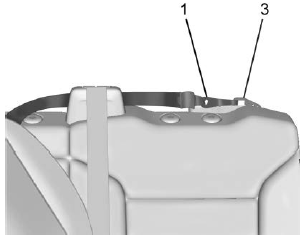
Driver Side Anchor and Loop (Double and Crew Cab)
Center Anchor and Loop (Double and Crew Cab)
Passenger Side Loop (Double and Crew Cab)
For double and crew cab models, the top tether is routed through loops (2) to the top tether anchors (1). Be sure to use the correct anchor for the seating position where the child restraint will be placed.
Be sure to read the following instructions to properly install a child restraint using these loops and anchors.
Do not secure a child restraint in a position without a top tether anchor that the top tether be attached, or if the instructions that come with the child restraint say that the top tether must be attached.
According to accident statistics, children and infants are safer when properly restrained in a child restraint system or infant restraint system secured in a rear seating position. See Where to Put the Restraint for additional information.
Securing a Child Restraint Designed for the LATCH System
Warning
A child could be seriously injured or killed in a crash if the child restraint is not properly attached to the vehicle using either the LATCH anchors or the vehicle seat belt. Follow the instructions that came with the child restraint and the instructions in this manual.
Warning
Do not attach more than one child restraint to a single anchor, except for the center top tether anchors in the crew cab models. Attaching more than one child restraint to a single anchor could cause the anchor or attachment to come loose or even break during a crash. A child or others could be injured. To reduce the risk of serious or fatal injuries during a crash, attach only one child restraint per anchor.
Warning
Children can be seriously injured or strangled if a shoulder belt is wrapped around their neck. The shoulder belt can tighten but cannot be loosened if it is locked. The shoulder belt locks when it is pulled all the way out of the retractor. It unlocks when the shoulder belt is allowed to go all the way back into the retractor, but it cannot do this if it is wrapped around a child’s neck. If the shoulder belt is locked and tightened around a child’s neck, the only way to loosen the belt is to cut it.
Buckle any unused seat belts behind the child restraint so children cannot reach them. Pull the shoulder belt all the way out of the retractor to set the lock, and tighten the belt behind the child restraint after the child restraint has been installed.
Caution
Do not let the LATCH attachments rub against the vehicle’s seat belts. This may damage these parts. If necessary, move buckled seat belts to avoid rubbing the LATCH attachments.
Do not fold the rear seat cushion when the seat is occupied. Do not fold the empty rear seat with a seat belt buckled. This could damage the seat belt or the seat. Unbuckle and return the seat belt to its stowed position, before folding the seat.
If you need to secure more than one child restraint in the rear seat, see Where to Put the Restraint.
Regular Cab Models
1. For models without a rear seat, forward-facing child restraints should only be installed in the right front seating position with Securing Child Restraints (In the Center Front Seat) or Securing Child Restraints (With the Seat Belt in the Rear Seat) or Securing Child Restraints (With the Seat Belt in the Front Passenger Seat).
If the child restraint manufacturer recommends that the top tether be attached, attach and tighten the top tether to the top tether anchor, if your vehicle has one. Refer to the child restraint instructions and the following steps:
1.1 Find the top tether anchor.
1.2 Route, attach, and tighten the top tether according to your child restraint instructions and the following instructions:
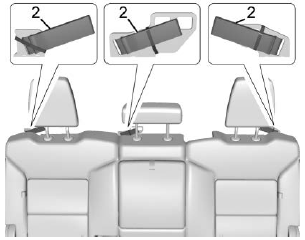
If the position you are using has an adjustable head restraint and you are using a dual tether, route the tether around the head restraint.
If the position you are using has an adjustable head restraint and you are using a single tether, raise the head restraint and route the tether under the head restraint and in between the head restraint posts.
2. Make sure the child restraint top tether hook is completely closed and secured to the top tether anchor.
3. Secure the child restraint in the right front seating position with the vehicle belts. See Securing Child Restraints (In the Center Front Seat) or Securing Child Restraints (With the Seat Belt in the Rear Seat) or Securing Child Restraints (With the Seat Belt in the Front Passenger Seat).
4. Before placing a child in the child restraint, make sure it is securely held in place. To check, grasp the child restraint at the belt path and attempt to move it side to side and back and forth. There should be no more than 2.5 cm (1 in) of movement for proper installation.
Double and Crew Cab Models
1. Attach and tighten the lower attachments to the lower anchors. If the child restraint does not have lower attachments or the desired seating position does not have lower anchors, secure the child restraint with the top tether and the seat belt. Refer to the child restraint manufacturer instructions and the instructions in this manual.
1.1 Find the lower anchors for the desired seating position.
1.2 Put the child restraint on the seat.
1.3 Attach and tighten the lower attachments on the child restraint to the lower anchors.
2. For forward-facing child restraints, attach and tighten the top tether to the top tether anchor, if your vehicle has one. Follow the child restraint instructions and the vehicle
LATCH anchor weight limits described at the beginning of this section, and the following steps:
Rear Driver Side Position
Rear Driver Side Position
2.1. For a top tether in the rear driver side position:
2.1.1. Remove the driver side head restraint and center headrest. See “Head Restraint or Headrest Removal and Reinstallation” later in this section.
2.1.2. For first time use, remove and discard the rubber band from the top tether loop (2).
2.1.3. Route the top tether (3) through the loop (2).
2.1.4. Attach the top tether (3) to the driver side of the center top tether metal anchor (1).
2.1.5. Make sure the child restraint top tether hook is completely closed and secured to the top tether anchor.
Rear Passenger Side Position
Rear Passenger Side Position
2.2. For a top tether in the rear passenger side position:
2.2.1. Remove
the passenger side head restraint and center headrest. See “Head
Restraint or Headrest Removal and Reinstallation” later in this section.
2.2.2. Route the top tether (3) through the loop (2).
2.2.3. Attach the top tether (3) to the passenger side of the center top tether metal anchor (1).
2.2.4. Make sure the child restraint top tether hook is completely closed and secured to the top tether anchor.

Rear Center Position
Rear Center Position
2.3. For a top tether in the rear center position:
2.3.1. Remove the driver side head restraint and center headrest. See “Head Restraint or Headrest Removal and Reinstallation” later in this section.
2.3.2. Route the top tether (1) through the center loop (2).
2.3.3. Attach the top tether (1) to the driver side top tether metal anchor (3).
2.3.4. Make sure the child restraint top tether hook is completely closed and secured to the top tether anchor.
3. Tighten the top tether per the child restraint manufacturer's instructions.
When the top tether is properly tightened, the loop may bend. This is normal and will not damage the vehicle.
If child restraints are installed in both outboard positions, both top tethers can be attached to the center anchor. Top tethers can be attached for child restraints in all three rear seating positions at the same time, following the routing instructions above.
4. Before placing a child in the child restraint, make sure it is securely held in place. To check, grasp the child restraint at the LATCH path and attempt to move it side to side and back and forth. There should be no more than 2.5 cm (1 in) of movement for proper installation.
Head Restraint or Headrest Removal and Reinstallation
The second row outboard head restraints or center headrest can be removed if they interfere with the proper installation of the child restraint.
To remove the second row head restraints or center headrest:
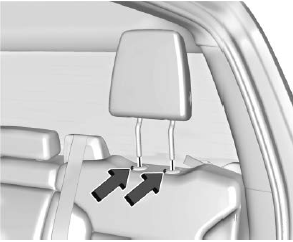
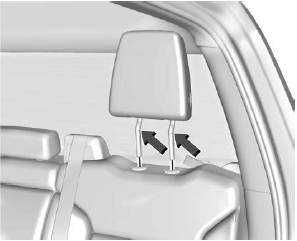
- Press both buttons on the head restraint or headrest posts at the same time, and pull up on the head restraint or headrest.
- Store the head restraint or headrest in a secure place.
- When the child restraint is removed, reinstall the head restraint or headrest before the seating position is used.
Warning
With head restraints that are not installed and adjusted properly, there is a greater chance that occupants will suffer a neck/spinal injury in a crash. Do not drive until the head restraints for all occupants are installed and adjusted properly.
To reinstall the head restraint or headrest:
- Insert the head restraint or headrest posts into the holes in the top of the seatback. The notches on the posts must face the driver side of the vehicle.
- Push the head restraint or headrest down.
- Try to move the head restraint or headrest to make sure that it is locked in place.
 Where to Put the Restraint
According to accident statistics, children and infants are safer when properly
restrained in an appropriate child restraint secured in a rear seating position...
 Replacing LATCH System Parts After a Crash
Warning
A crash can damage the LATCH system in the vehicle. A damaged LATCH system
may not properly secure the child restraint, resulting in serious injury or even
death in a crash...
Other information:
Chevrolet Silverado 2019-2026 Owners Manual: Loss of Control
Skidding There are three types of skids that correspond to the vehicle's three control systems: Braking Skid — wheels are not rolling. Steering or Cornering Skid — too much speed or steering in a curve causes tires to slip and lose cornering force...
Chevrolet Silverado 2019-2026 Owners Manual: Troubleshooting
See your dealer for service if a blue screen and are displayed in the mirror, and the display shuts off. Also, push the tab as indicated to return to the automatic dimming mode. The Rear Camera Mirror may not work properly or display a clear image if: There is glare from the sun or headlamps...
Categories
- Manuals Home
- 4th Generation Silverado Owners Manual
- 4th Generation Silverado Service Manual
- Engine Compartment Fuse Block
- Maintenance Schedule
- Programming Transmitters to the Vehicle
- New on site
- Most important about car
Folding Mirrors
Manual Folding Mirrors
If equipped, push the mirror toward the vehicle to fold. Push the mirror outward to return to its original position.
Manually fold the mirrors inward to prevent damage when going through an automatic car wash.
Power Folding Mirrors