Chevrolet Silverado: Driver Assistance Systems / Assistance Systems for Parking or Backing
If equipped, the Rear Vision Camera (RVC), Surround Vision, Rear Park Assist (RPA), Front Park Assist (FPA), and Rear Cross Traffic Alert (RCTA) may help the driver park or avoid objects. Always check around the vehicle when parking or backing.
The RVC, RPA, and Surround Vision will not work properly if the tailgate is down. If the tailgate is down, do not use these systems.
Rear Vision Camera (RVC)
When the vehicle is shifted into R (Reverse), the RVC displays an image of the area behind the vehicle in the infotainment display. The previous screen displays when the vehicle is shifted out of R (Reverse) after a short delay. To return to the previous screen sooner, press any button on the infotainment system, shift into P (Park), or, while in D (Drive), reach a vehicle speed of approximately 12 km/h (8 mph). The rear vision camera is in the tailgate handle.
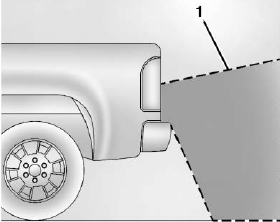
- View Displayed by the Rear Vision Camera
- View Displayed by the Rear Vision Camera
- Corners of the Rear Bumper Displayed images may be farther or closer than they appear. The area displayed is limited and objects that are close to either corner of the bumper or under the bumper do not display.
A warning triangle may display to show that Rear Park Assist (RPA) has detected an object. This triangle changes from amber to red and increases in size the closer the object.
If equipped with Hitch View, see “Surround Vision” following.
Surround Vision
If equipped the Surround Vision system can display various views surrounding the vehicle in the infotainment display. See below for camera view descriptions and more information.
Warning
The Surround Vision cameras have blind spots and will not display all objects near the corners of the vehicle. Folding outside mirrors that are out of position may not display surround view correctly. Always check around the vehicle when parking or backing.
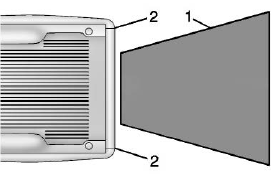
- Views Displayed by the Surround Vision Cameras
- Area Not Shown
- Views Displayed by the Surround Vision Cameras
- Area Not Shown
Warning
The camera(s) do not display children, pedestrians, bicyclists, crossing traffic, animals, or any other object outside of the cameras’ field of view, below the bumper, or under the vehicle. Shown distances may be different from actual distances. Do not drive or park the vehicle using only these camera(s). Always check behind and around the vehicle before driving. Failure to use proper care may result in injury, death, or vehicle damage.
Camera Views
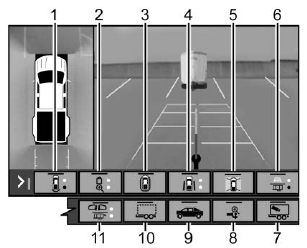
Touch the camera view buttons along the bottom of the infotainment display to access each view (if equipped):
- Front/Rear Standard View Displays an image of the area in front or behind
the vehicle. To select, touch Front/Rear Standard View on the infotainment display
when a camera view is active. Touch the button to toggle between front and rear
camera views.
When the hitch guidance is selected, Rear Standard View will remain visible across gear changes, otherwise the view will toggle between Front and Rear Standard View based on gear position.
If equipped, the front view camera also displays when the Park Assist system detects an object within 30 cm (12 in).
- Front/Rear Overhead View
Displays a front or rear overhead view of the vehicle. To select, touch Front/Rear Top-Down View on the infotainment display when a camera view is active. Touch the button to toggle between front and rear camera views.
- Rear Bowl View
Displays a perspective view of the vehicle from the front looking rearward. To select, touch Rear Bowl View on the infotainment display when a camera view is active. Park Assist and Rear Cross Traffic Alert (RCTA) overlays are not available when bowl view is active.
- Front/Rear side View
Displays a view that shows objects next to the front or rear sides of the vehicle. To select, touch Front/Rear Side View on the infotainment display when a camera view is active. Touch the button to toggle between front and rear camera views. Park Assist and RCTA overlays are not available when Front/Rear Side View is active.
The Turn Signal Activated View works with Rear Side View to provide a rearward view of the left or right side of the vehicle and trailer. Views are provided based on turn signal activation with the right-side view being shown when the right turn signal is active and the left side view being shown when the left turn signal is active. The feature is available when a trailer is connected. The feature can be enabled or disabled. See Vehicle Personalization. Touch X to exit.
- Surround View
Displays an image of the area surrounding the vehicle. Surround View is available as part of the Front/Rear Standard Views, the Front/Rear Top-Down Views and the Front/Rear Side Views. In these views Surround View can be enabled by touching Surround View on the infotainment display when the camera view is active.
- Guidance Lines/Hitch Guidance
Guidance Lines displays available guidelines, including Standard and Hitch Guidance. A grayed-out icon indicates that guidelines are not available. To enable, touch Guidance Lines on the infotainment display when a camera view is active. Touching the button multiple times will toggle through Standard Guidelines, Hitch Guidance and no guidelines. Standard guidelines are available in Front/Rear Standard Views, Front/Rear Top-Down Views and Surround View.
Hitch Guidance displays a single centered guideline on the infotainment display to assist with aligning the vehicle’s hitch ball with a trailer coupler. Touch the Hitch Guidance icon, then align the trailer guidance line over the trailer coupler. Continuously steer the vehicle to keep the guideline centered on the coupler when backing. Park Assist overlays will not display when the trailer guidance line is active. Hitch Guidance is available in Rear Standard View.
Warning
Use Hitch Guidance only to help back the vehicle to a trailer hitch or, when traveling above 12 km/h (8 mph), to briefly check the status of your trailer. Do not use for any other purpose, such as making lane change decisions. Before making a lane change, always check the mirrors and glance over your shoulder. Improper use could result in serious injury to you or others.
- Interior Trailer View
Provides a view of the interior of the trailer. The feature is available when a trailer is connected. The feature requires user installation of an accessory trailer camera on the interior of the trailer per the accessory trailer camera installation instructions (see your dealer for accessory trailer camera(s) and information). To select, touch Interior Trailer View on the infotainment display when a camera view is active. To access this view when in a forward gear above 12 km/h (8 mph), touch CAMERA on the infotainment display and touch the Interior Trailer View icon. The view will close after 8 seconds and can be closed early by touching X.
- Hitch View
Assists with connecting to a trailer by providing a zoomed-in view of the hitch to help align the vehicle’s hitch ball with the trailer coupler, or to monitor the trailer connection. To select, touch Hitch View on the infotainment display when a camera view is active. To access this view when in a forward gear above 12 km/h (8 mph), touch CAMERA on the infotainment display and touch the Cargo Bed View icon. The view will close after 8 seconds and can be closed early by touching X. Shifting into P (Park) while in this view will automatically engage the Electric Parking Brake (EPB).
- Bed View
Provides a view of the truck bed and the area behind the vehicle to assist in cargo or hitch monitoring or hitching to a fifth wheel or gooseneck trailer. To select, touch Bed View on the infotainment display when a camera view is active. To access this view when in a forward gear above 12 km/h (8 mph), touch CAMERA on the infotainment display and touch the Bed View icon. The view will close after 8 seconds and can be closed early by touching X.
- Transparent Trailer View
Provides a view that allows the driver to virtually “see through” the trailer. The feature is available when a compatible trailer is connected and a profile is configured and selected via the Trailering App. See Trailering App. The feature requires user installation of an accessory trailer camera on the rear exterior surface of the trailer per the accessory trailer camera installation instructions (see your dealer for accessory trailer camera(s) and information). To select, touch Transparent Trailer View on the infotainment display when a camera view is active. To access this view when in a forward gear above 12 km/h (8 mph), touch CAMERA on the infotainment display and touch the Transparent Trailer View icon. Touch X to exit.
When the system is calibrated and the trailer position is known, one of three views will be shown; Transparent Trailer View, Left Transparent Trailer View or Right Transparent Trailer View. The Transparent Trailer View is shown when the position of the trailer is relatively straight behind the vehicle. The Left or Right Transparent Trailer View is shown when the position of the trailer is too far to the left or right. When the system is not calibrated or trailer position is not known the Transparent Trailer Picture-in-Picture View will be shown.
- Rear Trailer View/Rear Side View with Available Articulation Functionality/Picture-in-Picture
Side View .
- Rear Trailer View provides a view of the area behind the trailer. the feature is available when a trailer is connected. The feature requires user installation of an accessory trailer camera on the rear exterior surface of the trailer per the accessory trailer camera installation instructions (see your dealer for accessory trailer camera(s) and information). To select, touch Rear Trailer View/Rear Side View with Available Articulation Functionality/ Picture-in-Pictue Side View on the infotainment display when a camera view is active. Each touch will toggle through the Rear Trailer View, Trailer Tow Mirror View and Combo View. To access this view when in a forward gear above 12 km/h (8 mph), touch CAMERA on the infotainment display and touch the Interior Rear Trailer View/Rear Side View with Available Articulation Functionality/Picture-in-Picture Side View icon. Touch X to exit.
- Rear Side View with Available Articulation Functionality provides a rearward split view of the left and right sides of the vehicle and trailer. When in a forward gear the view well automatically pan to show more of the left or right side based on the position of the trailer. The feature is available when a trailer is connected. To select, touch Rear trailer View/Rear Side View with Available Articulation Functionality/Picture-in-Picture Side View on the infotainment display when a camera view is active. Each touch will toggle through the Rear Trailer View, trailer tow Mirror view and Combo View. To access this view when in a forward gear above 12 km/h (8 mph), Touch CAMERA on the infotainment display and touch the Rear Trailer View/Rear Side View with Available Articulation Functionality/ Picture-in-Picture Side icon. Touch X to exit.
- Provides a rearward split view of the left and right sides of the vehicle and trailer with an overlay view of the area behind the trailer. The feature is available when a trailer is connected. the feature requires user installation of an accessory trailer camera on the rear exterior surface of the trailer per the accessory trailer camera installation instructions (see your dealer for accessory trailer camera(s) and information). To select, touch Rear Trailer View/Rear Side View with Available Articulation Functionality/Picture-in-Picture Side view on the infotainment display when a camera view is active. Each press of the button will toggle through the Rear Trailer View, Trailer Tow mirror View and Combo View. To access this view when in a forward gear above 12 km/h (8 mph), touch CAMERA on the infotainment display and touch the Rear Trailer View/Rear Side View with Available Articulation Functionality/Picture-in-Picture Side View icon. Touch X to exit.
HD Surround Vision with Trailer Camera Provisions
If equipped, this feature provides additional views to aid in trailering/towing. The system shows multiple views in the infotainment display using five cameras mounted around the vehicle and up to two additional accessory cameras that can be mounted on or in a trailer. The front camera is in the grille under the front emblem, the side cameras are on the bottom of the outside mirrors, the rear camera is in the tailgate handle and the bed camera is mounted on the rear of the cab. Additionally, up to two accessory cameras can be mounted to the rear and/or interior of the trailer. See your dealer for accessory trailer cameras. To access, touch CAMERA on the infotainment display or shift to R (Reverse). To return to the previous screen when not in reverse, touch the Home or Back buttons on the infotainment display.
- Available camera views:
- Front/Rear Standard View
- Front/Rear Top-Down View
- Rear Bowl View
- Front/Rear Side View
- Hitch View
- Bed View
- Rear trailer View
- Rear Side view with a available articulation functionality
- Picture-in-Picture Side View
- Interior Trailer View
- Transparent trailer View
- Surround View
- Guidance Lines
- Hitch Guidance
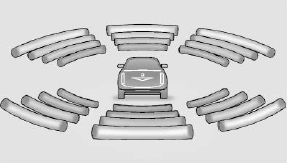
Surround Vision (360 Degrees)
If equipped, the Surround Vision system can display various views surrounding the vehicle in the infotainment display using four cameras mounted around the vehicle. The front camera is in the grille under the front emblem, the side cameras are on the bottom of the outside mirrors, and the rear camera is in the tailgate handle.
The Surround Vision system can be accessed by selecting CAMERA in the infotainment display or when the vehicle is shifted into R (Reverse). To return to the previous screen sooner, when not in R (Reverse), press the Home or Back button on the infotainment system, shift into P (Park), or, while in D (Drive), reach a vehicle speed of approximately 12 km/h (8 mph).
Available camera views:
- Front/Rear Standard View
- Front/Rear Top-Down View
- Rear Bowl View
- Front/Rear Side View
- Hitch View
- Surround View
- Guidance Lines
- Hitch Guidance
Surround Vision
If equipped, this feature provides, additional views to aid in trailering/towing. The Front Vision Camera and Surround Vision cameras are not supported. The system can show various views in the infotainment display using cameras mounted in and around the vehicle and trailer. The rear camera is in the tailgate handle and the cargo bed the cab. Up to two accessory cameras can be mounted to the rear and/or interior of the trailer. See your dealer for these accessory cameras.
The system can be accessed by selecting CAMERA in the infotainment display or when the vehicle is shifted into R (Reverse). To return to the previous screen sooner, when not in R (Reverse), press the Home or Back button on the infotainment system or shift into P (Park).
Available camera views:
- Rear Standard View
- Hitch View
- Bed View
- Rear Trailer View
- Interior Trailer View
- Guidance Lines
- Hitch Guidance
Troubleshooting
The Transparent Trailer calibration may take longer than expected or not calibrate if:
- The vehicle is driven too fast during calibration. Speed should be maintained below 50 km/h (31 mph).
- The vehicle is not driven straight during calibration. Steering should be maintained as straight as possible, excessive steering during calibration may extend calibration time.
- The calibration is attempted in low light. Calibration should be attempted when there is enough light.
- The calibration is attempted during adverse weather conditions. Calibration during conditions such as snow or heavy rain should be avoided.
- The road surface is not ideal for calibration. Calibration should be attempted on an alternate road surface.
- The accessory trailer cameras are swapped at the hitch connector. Ensure that the camera mounted to the rear of the trailer is connected to the rear trailer camera input.
- The accessory trailer camera is mounted, angled or rotated outside of the defined mounting location (see camera installation instructions).
Distortion may be observed in the calibrated Transparent Trailer View if:
- The accessory trailer camera is mounted, angled or rotated outside of the defined mounting location (see camera installation instructions).
The Transparent Trailer icon may appear grayed out if:
- A compatible trailer profile is not configured or a non-compatible trailer profile is selected.
- The vehicle is in R (Reverse).
- The trailer is not connected.
- The accessory rear trailer camera is not connected or connected to the incorrect input.
The preview may not be provided or the wrong preview may be provided if:
- The accessory cameras are not recognized. Ensure that the accessory camera(s) are connected and power cycle the vehicle.
- The accessory trailer cameras are swapped at the hitch connector. Ensure that the accessory camera(s) are connected to the correct input.
- The accessory trailer camera(s) are connected to the correct camera input.
- The accessory trailer camera(s) are not installed according to the installation instructions.
A feature may be unavailable or not activating as expected if:
- The customization is disabled. Check the customization settings where applicable.
- The accessory trailer cameras are swapped at the hitch connector. Ensure that the accessory camera(s) are connected to the correct camera input.
A view may switch automatically if:
- The vehicle is shifted to another gear.
Park Assist
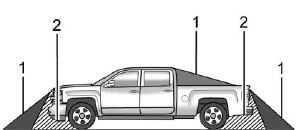
With Front and Rear Park Assist, as the vehicle moves at speeds of less than 8 km/h (5 mph) the sensors on the bumpers may detect objects up to 1.2m (4 ft) in front and 2.5 m (8 ft) behind the vehicle within a zone 25 cm (10 in) high off the ground and below bumper level. These detection distances may be shorter during warmer or humid weather. Blocked sensors will not detect objects and can also cause false detections. Keep the sensors clean of mud, dirt, snow, ice, and slush; and clean sensors after a car wash in freezing temperatures.
Warning
The Park Assist system does not detect children, pedestrians, bicyclists, animals, or objects located below the bumper or that are too close or too far from the vehicle. It is not available at speeds greater than 8 km/h (5 mph). To prevent injury, death, or vehicle damage, even with Park Assist, always check the area around the vehicle and check all mirrors before moving forward or backing.
The instrument cluster may have a Park Assist display with bars that show “distance to object” and object location information for the Front and Rear Park Assist system. As the object gets closer, more bars light up and the bars change color from yellow to amber to red.
When an object is first detected in the rear, one beep will be heard from the rear, or both sides of the Safety Alert Seat will pulse two times. When an object is very close —<0.4m (1.5 ft) in the vehicle rear or <0.3m (1 ft) in the vehicle front — a continuous beep will sound from the rear or front depending on object location, or both sides of the Safety Alert Seat will pulse five times. Beeps for FPA are higher pitched than for RPA.
Rear Cross Traffic Alert (RCTA)
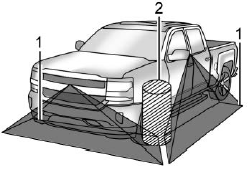
If equipped, when the vehicle is shifted into R (Reverse), RCTA shows a red warning triangle with a left or right pointing arrow on the infotainment display to warn of traffic coming from the left or right. This system detects objects coming from up to 20m (65 ft) from the left or right side of the vehicle. When an object is detected, either three beeps sound from the left or right or three Safety Alert Seat pulses occur on the left or right side, depending on the direction of the detected vehicle.
Use caution while backing up when towing a trailer, as the RCTA detection zones that extend out from the back of the vehicle do not move further back when a trailer is towed.
RCTA is disabled when the trailer connection status is displayed.
RCTA can be turned off. See “Collision/Detection Systems” under Vehicle Personalization.
Turning the Features On or Off

PressXon the center stack to turn on or off the Front and Rear Park Assist. The indicator light next to the button comes on when the features are on and turns off when the features have been disabled.
Front and Rear Park Assist can be turned Off, On, or On with Towbar. See “Park Assist” under Vehicle Personalization. If Park Assist is turned off through vehicle personalization, the Park Assist button will be disabled. To turn Park Assist on again, select On in vehicle personalization. The On with Towbar setting allows Park Assist to work properly with a trailer hitch. Some larger trailer hitches may not be compatible.
Turn off Park Assist when towing a trailer.
To turn the RPA symbols on or off, see “Rear Camera Park Assist Symbols” under Vehicle Personalization.
Assistance Systems for Driving
If equipped, when driving the vehicle in a forward gear, Forward Collision Alert (FCA), Lane Departure Warning (LDW), Lane Keep Assist (LKA), Side Blind Zone Alert (SBZA), Lane Change Alert (LCA), Automatic Emergency Braking (AEB), and/or the Front Pedestrian Braking (FPB) System can help to avoid a crash or reduce crash damage.
 Driver Assistance Systems
This vehicle may have features that work together to help avoid crashes or reduce
crash damage while driving, backing, and parking. Read this entire section before
using these systems...
 Forward Collision Alert (FCA) System
If equipped, the FCA system may help to avoid or reduce the harm caused by front-end
crashes. When approaching a vehicle ahead too quickly, FCA provides a red flashing
alert on the windshield and rapidly beeps or pulses the driver seat...
Other information:
Chevrolet Silverado 2019-2026 Owners Manual: Antilock Brake System (ABS) Warning Light
This warning light should come on briefly when the vehicle is turned on. If the light does not come on, have it fixed so it will be ready to warn if there is a problem. If the light comes on while driving, safely stop as soon as it is possible and turn off the vehicle...
Chevrolet Silverado 2019-2026 Owners Manual: Seat Belts
This section describes how to use seat belts properly, and some things not to do. Warning Do not let anyone ride where a seat belt cannot be worn properly. In a crash, if you or your passenger(s) are not wearing seat belts, injuries can be much worse than if you are wearing seat belts...
Categories
- Manuals Home
- 4th Generation Silverado Owners Manual
- 4th Generation Silverado Service Manual
- Driver Information Center (DIC) (Base Level)
- Head-Up Display (HUD)
- Steering Column Lock
- New on site
- Most important about car
Power Door Locks
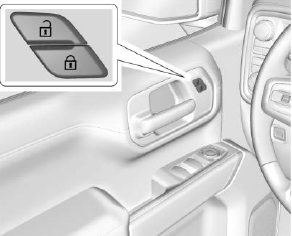
If equipped with power door locks.
 : Press to lock the doors.